
Survival of the fittest is a Charles Darwin theory of evolution; one of the very famous lines which still has its importance in the real world. Well inheriting the acts of the real world, technology has grown and developed and all that we can see on the internet these days is the virtual replica of the world.
So is the case of the Apps and one of them is Minecraft game. Minecraft is the situation of survival amidst the wild and only with the help of infinite blocks available with oneself. Minecraft game has been a celebrated game amongst the masses but with Minecraft 2019 update, it seems like a cherry on the pie. This is one of the oldest and most favorite games for mobile devices following its successful PC version. It is creative too.
If you are a beginner and struggling with the gameplay of Minecraft, there are ample of tutorials available on the internet to take help from. The difficulty level in the game is divided into three levels viz., beginner, normal, and advanced. Learning the basic gameplay of Minecraft is not a challenge but what makes difference is how to make a Lead in Minecraft.
This article is a step-by-step guide bringing you the amazing tricks to stay ahead of all the Minecrafters.
Table of Contents
Basic Requirements for Taking the Lead
Before we give you the steps to take a lead, let us understand the prerequisites in terms of material. For materials, you should have a Slimeball, four strings, and a crafting table. The crafting table should be in a 3X3 grid. Keep the table on the map and stand in front of it. You can create the crafting table under the crafting menu.
If you are using Mac PC, you can right-click on the crafting table to open it. In mobile pocket edition, simply tap on the crafting menu. If you are playing it on PS3 or PS 4, click on the square shape icon for opening the crafting menu. For gamers playing on Xbox One and Xbox 360, click on the X button. Now do as directed below.
Read – 10 Best Cloud Gaming Services to Stream Video Games
Step 1 – Get a Lead
In order to get a lead, you need to use four strings and one slimeball and place them in a 3X3 grid. While doing it, make sure that you keep the strings and slimeball at the right place. This is quite important!
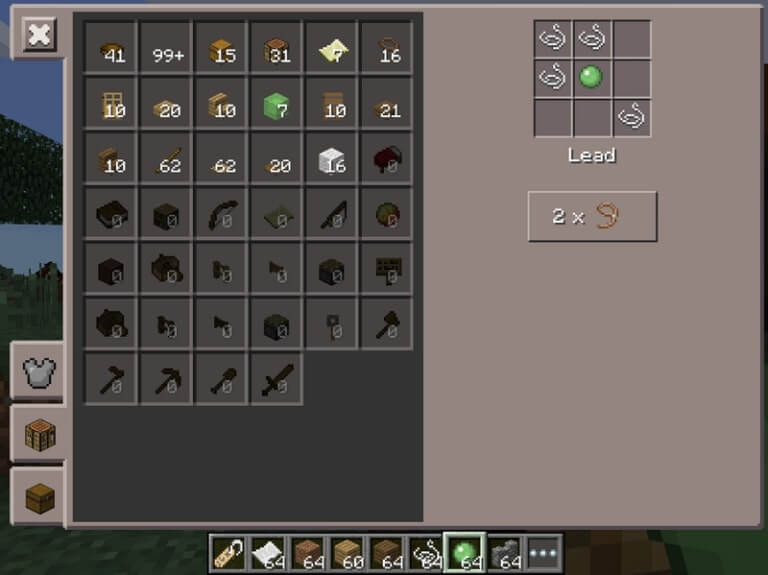
Step 2 – Arrangement of Strings & Slimeball
All the strings and a slimeball should be placed in the right grid. The first string should be kept in the first box of the first row and the other string in the text box. Now, in the second row, put 1 string in the first box and slimeball in the second box.
Step 3 – The Crafting Part
In the third row, the remaining string will be placed. After that, you will be ready for Crafting. If you want to change the pattern, there is also a need to change the items in the crafting.
When you complete the arrangement according to the above steps, the lead will generate in the box on the right side. The lead so crafted is the final result.
Step 4 – Transformation of Lead into Inventory

Once you get the lead, now see the pattern. You have to then move the lead to inventory. The inventory is divided into two regions in the game. One is the top 3 rows which you can not use early in the game. Then there is a fourth row which is also known as Hot bar. Items in this row can be used immediately.
Step 5 – Know Your Item ID
You should know the item ID in the game. Plus, you should also know the name of the block in order to use the command. This will help you in the correct execution of the game command. That’s all!
You would also love to read how to edit the Skin in the Minecraft game.
Read – 15 Safe ROM Sites to Download Classic Gaming ROMs
Minecraft allows us to connect other Minecraft users and create a huge world of your own, where you can build Wonders of World or even the world of the movie Harry Potter. This game is available on various platforms like PC, Playstation, Xbox and even on Android/IOS. This game includes three modes which are Survival mode, Spectate Mode and Creative Mode respectively.
You might have seen in the game that there are some many users who have customized skins which are not available officially by Minecraft. Thus, there are so many users who always want to customize their skin. So, in this article, we will reveal how you can customize your skin in Minecraft and have a better and unique look than the default look.
How to Edit Default Skin in Minecraft Game?

Players have no more misery to play with the default skin of Minecraft characters. Customizing Minecraft skin is possible so you can double up the fun and adventure with dynamic looking skins. Customization is not a big deal.
All you have to do is download the skin from the Minecraft preference website and then make the desired editing through the paint software. Once you are done with the editing, you can upload it back to the game.
If you are too lazy to do this trick, there is a more easy way to customize skin in Minecraft game and i.e. Minecraft Skin Edit tool. Using this tool editing even the minute details like hair color is a breeze. To assist you further on this, below are some steps that can guide you well for carving the best skin using this tool. So get ready to show off the customized skin by you.
- Start with downloading the Minecraft Skin Edit tool if not yet.
- Open the tool.
- Check the preview of the skin on the home page.
As you see changing the skin in Minecraft game is not a rocket science. You can do it easily. Besides what mentioned above, there are various other skins available on Minecraft forum which you can download for free. The forum offers you options to customize and get your skins designed by the masters. You just need to request on the forum page.
")


