
Google Camera has revolutionized smartphone photography and provides powerful camera features for budget Android devices. If you don’t have a pixel smartphone, GCam Mod is the best camera app out there.
We can say that Google Pixel has set the benchmark for other brands as well. On further investigation, it was found that the is nothing extraordinary with the camera sensors, the image processing is where the magic happens.
In line with our efforts to bring GCam to pixel-free devices, this article brings together the latest Google Camera modifications for most devices. Also, we mentioned in a few simple steps how to install the APK and activate the astrophotography mode. So let’s quickly discover how to install Google Camera on any Android device.
Table of Contents
Some things to consider
- Your Android device must be compatible with Camera2API to run the latest version of GCam. To check compatibility, download and open the Camera2 API Probe app (free). If you see “LIMITED,” “FULL” or “LEVEL_3”, you are ready to go.
- If “LEGACY” is displayed, you can follow our instructions and learn how to root and activate Camera2API on your smartphone.
- As with all GCams, some features may work on one device and may not work on the other. Therefore, you should use the XML configuration files to get the best result. The following describes how you can apply XML files to devices. Therefore, follow the instructions to get the best result.
- On some devices, you don’t need to download XML files because it already has optimized APK for that device. However, if you see something is popping up about the settings on the download page, please download and apply the XML file.
Features of Google Camera
GCam App has lots of features. Here are some of its best features.
- Accelerate image processing
- It has HDR+ which is advanced High Dynamic Range imaging. HDR+ can take consecutive burst shots with short exposures.
- You can take motion photos.
- It has video stabilization.
- It has the feature of smart-burst. This feature can take 10 shots in a second.
How do I check support for Camera2 API?
Now the question comes, How can you check if your Android device supports Camera2 API? All you need to do is download and run a simple app called “Camera2 API Probe” from the Google Play Store. The app provides detailed information about the front and rear camera sensors of your Android phone. With this information, you can easily deduce whether or not your Android device supports the Camera2 API.
These below-given steps will help you throughout the procedure in detail.
Step 1: Install the Camera2 API Probe app.
By default, the standard camera app on your phone or another section of the operating system notifies you if the device supports this API. Therefore, we use a simple third-party application to verify support for the Camera2 API on Android.
After installing and examining almost any other app available for this purpose, we finally concluded that the March Media Labs Camera2 API Probe app was the best. We also test the app on different OEM devices with varying versions of the Android operating system and update the correct results every time.
First, click on the download link below and install the app on your Android device through the Play Store.
Once the app is installed, you can easily use it to check Camera2 API compatibility on your Android device. The next step explains how to use the application and the information it contains.
Step 2: use the app to check Camera2 API compatibility.
Here is an essential part of the manual. So please follow it carefully. Launch the Camera2 API Probe application after installation by accessing the application bar. It shows you detailed information about the camera hardware. It also runs information about the current Android device and the operating system that runs on it.

You will see two sections: Camera ID: 0 and Camera ID: 1. The first represents the rear camera, while the second represents the front camera of your Android device.
Step 3: different levels of compatibility with Camera2 API.
Beneath each camera ID is a subcategory of various functions and their support details. One of these subcategories is the “Hardware Level Support Category,” which indicates the level of support for the Camera2 API on your phone.
The levels of support here relate to the type of API implementation that was performed on a particular device. According to the official documentation, there are four different levels of support for the Camera2 API. These are level 3, full, limited, or earlier. Here is the explanation of each of these support levels in simple terms:
Level 3: The device OEM has added some additional features to the camera hardware, including YUV reprocessing, RAW image capture, etc.
- Complete: The smartphone supports all the main functions of the Camera2 API.
- Restricted: The phone only supports some of the Camera2 API functions.
- Legacy: Your Android smartphone only supports API Camera1 functions. So there is no support for Camera2 API.
Read – 5 Popular Smartphone Myths That Aren’t True
Download GCAM for You Android Device
- Realme 6 Pro (Download)
- Realme 6 (Download)
- Realme 5 Pro (Download)
- Realme 5 (Download)
- Realme 3 Pro (Download)
- Realme 3 (Download)
- Realme 2 Pro (Download)
- Realme 1 (Download)
- Realme X2 (Download)
- Realme X2 Pro (Download)
- Realme X (Download)
- Realme XT (Download)
- Poco X2 (Download)
- Poco F1 (Download)
- OnePlus 7, 7 Pro, 7T, 7T Pro (Download APK, XML Config, Enable Aux Camera [Magisk Module])
- OnePlus 6, 6T (Download)
- OnePlus 5, 5T (Download APK, XML Config)
- OnePlus 3 (Download)
- Redmi K20 / K20 Pro (Download)
- Redmi Note 8 Pro (Download)
- Redmi Note 8 (Download)
- Redmi Note 7, 7S, 7 Pro (Download)
- Redmi Note 5 Pro, 6 Pro (Download)
- Mi A3 (Download)
- Mi A2 (Download)
- Mi A1 (Download)
- Mi A2 Lite (Download)
- Zenfone Max Pro M1 (Download for Android P, Download for Android Q)
- Zenfone Max Pro M2 (Download)
- Nokia 8.1 (Download)
- Nokia 7.2, 7.1 (Download)
- Other Nokia Devices (Download)
- Samsung Galaxy A71 (Download)
- Samsung Galaxy S10 Lite (Download)
- Oppo Reno 10X Zoom (Download)
- Asus Zenfone 5Z (Download for Pie, Download for Q)
How to Install Google Camera on any Android device

1. Download the Google Camera APK for your device using the links in the previous section and install it on your device.
2. The installation can be blocked because you downloaded the APK from a third-party source. To continue, press “Allow” and continue with the installation.
3. That is all. Now open Google Camera, and you will see the new GCam interface.
How to apply an XML configuration file to Google Camera APK
- After GCam installation is completed, download the XML configuration file and search for it through a file manager. Most likely, it is in the Downloads folder. Now copy the XML file and paste it in the GCam -> Configs folder in your internal memory.
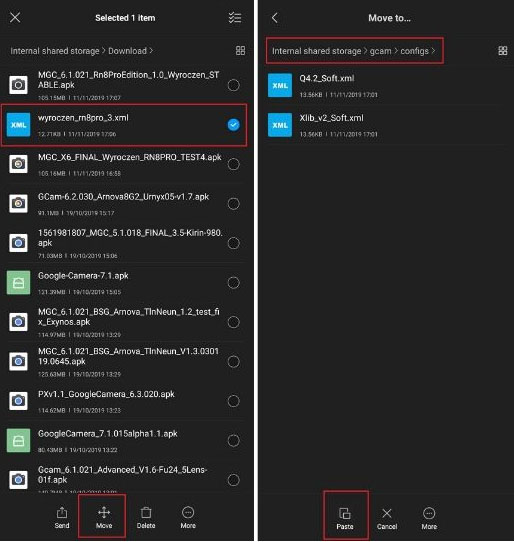
- If the directory is not available, create a GCam folder and then a Configs folder in the GCam folder. Now you can move the XML file.
- Then open Google Camera and double-tap the black bar around the shutter. A dialog box will appear. From the drop-down menu, select the XML configuration file you just moved to the Configs folder. Finally, press the “Restore” button.

- XML settings are now applied immediately, and you are ready to get the best out of Google camera.
- Here are some tips to take awesome pictures with your smartphone.
Activate astrophotography mode
1. With some cameras, astrophotography may not work right away. To activate it manually, swipe down on the viewfinder and tap the gear settings icon.

2. Open “Advanced Settings” and enable Force astrophotography mode.

3. If you now switch to night vision mode, you will be asked to activate astrophotography mode. However, please note that you need a tripod and a dark place to enable this function. If you have a steady hand or you can place the camera on a stable surface, you can remove the tripod.
")


